Another stock photo I edited (original photo by bruisedkiwistock on devianART) a couple of years ago.


Click here to view all before/after posts.
before/after
Another stock photo I edited (original photo by bruisedkiwistock on devianART) a couple of years ago.


Click here to view all before/after posts.
This is a stock photo I edited last summer (original photo by Marili on devianART). I used Lightroom, did some adjustments in saturation, color balance and split toning on the whole image. Then used adjustment brush to soften the skin, brighten the eyes and add some color to the hair.


Click here to view all before/after posts.
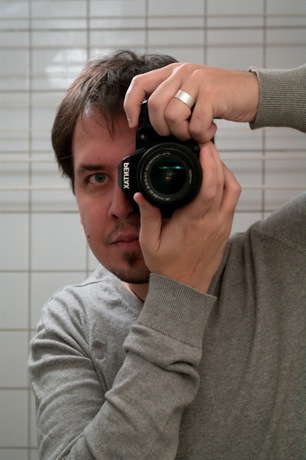
This is not meant to be a tutorial, I just thought it would be cool to show the steps that led to creating my all time favorite self-portrait (as of yesterday). I use Lightroom for editing, but I won't go into technical details, the process is far more interesting and can be done in most of the photo editing programs.
First, the obligatory before/after image.


(continued on next page)
1. This is the original photo I took in my bathroom.

2. I started by fixing white balance and brightness/blacks levels.
3. I tried different brightness and contrast settings but wasn't satisfied. The image was lacking something, it was too dull. So I thought I should make it high key instead and I dodged my eye a bit.

4. Next, it was time for some split-toning. I like mixing "cold" and "warm" tones (mostly to the "cooler" side) so I went for some green and red.

5. The right part of the image was a bit too dark compared to the rest, so I added some "light" by using a graduated filter with added brightness.

6. I was quite happy at this point, but there still was something bugging me. The background was distracting. I started dodging the lines and it was then that it struck me. Why not completely white out the background to make it look like a big light source? I also changed the color to give an overall greenish tint.

7. Finally, some fine brush work and the haircut!

I may not like snow that much but it makes for some fine photos! This is one of my favorite views of Uppsala domkyrka (cathedral) and it gets so much more beautiful with some snow.
I've posted the b&w version of the photo on Flickr but couldn't really decide between that and the color version, so here there are both of them with the "before/after" slider I used in two older posts.


I've always liked "before and after" images, like the photos in this gallery, or this one (but, please, no celebrities!).
Some time ago I found the Before/After jQuery plugin and I've finally got it working inside a post. Thanks to Zach Fine of "in LA”, who took the original plugin, created by the admin of "Catch My Fame”, modified and wrapped it into a Wordpress plugin. I've just changed the color of the slider handle to match the colors of the blog (by the way, orange is my favorite color!)
So, here is the first before/after image. It's a photo of Vayia, friend and my yoga teacher some time ago. I took the photo last summer during a photo shoot with Andreas, photographer and Vayia's husband. You can view the "after” photo in a Flickr set, along with other photos from the photo shoot, here.


Drag the handle or click anywhere on the image to move the slider. Tap if you're on an iPhone or iPad.